> ## Documentation Index
> Fetch the complete documentation index at: https://docs.blocks.team/llms.txt
> Use this file to discover all available pages before exploring further.
# GitHub Enterprise (MU)
> Connect a GitHub Enterprise (MU) managed user tenant to Blocks with a customer-owned GitHub App
## Overview
GitHub Enterprise (MU) connects Blocks to a GitHub Enterprise managed user tenant by using a GitHub App that you create and own in your enterprise organization.
This guide uses `CubeOrgSquaredApp` as an example app name. You can choose any unique, descriptive name for your own app.
This setup creates fresh credentials for your GitHub App. Do not copy app IDs, client IDs, private keys, webhook secrets, or client secrets from another app.
## Prerequisites
* Organization owner or admin access in your GitHub Enterprise managed user tenant
* Admin access to your Blocks workspace
* Your enterprise web host URL, such as `https://cubeorg.ghe.com`
* Your enterprise API host URL, such as `https://api.cubeorg.ghe.com`
* A secure place to store the generated webhook secret, client secret, and private key
For GitHub's own setup references, see [Registering a GitHub App](https://docs.github.com/en/apps/creating-github-apps/registering-a-github-app/registering-a-github-app), [Choosing permissions for a GitHub App](https://docs.github.com/en/apps/creating-github-apps/registering-a-github-app/choosing-permissions-for-a-github-app), and [Managing private keys for GitHub Apps](https://docs.github.com/en/apps/creating-github-apps/authenticating-with-a-github-app/managing-private-keys-for-github-apps).
## Step 1: Create a GitHub App
In your enterprise organization, open:
```txt theme={null}
https:///organizations//settings/apps/new
```
For example, if your enterprise web host is `https://cubeorg.ghe.com` and your org is `CubeOrgSquared`, open:
```txt theme={null}
https://cubeorg.ghe.com/organizations/CubeOrgSquared/settings/apps/new
```
GitHub also links to this flow from **Organization settings > Developer settings > GitHub Apps > New GitHub App**.
## Step 2: Enter basic app details
Use these values when creating the app:
| Field | Value |
| --------------- | ------------------------------------------ |
| GitHub App name | A unique name, such as `CubeOrgSquaredApp` |
| Description | Optional |
| Homepage URL | `https://blocks.team` |
Under **Identifying and authorizing users**, add these callback URLs in this exact order:
```txt theme={null}
https://api.prod.blocks.team/v1/webhooks/github/completion
https://api.prod.blocks.team/v1/webhooks/github/redirect
https://api.prod.blocks.team/v1/webhooks/github/redirect?is_onboarding=true
```
Then set:
| Option | Setting |
| ------------------------------------------------------ | --------- |
| Request user authorization (OAuth) during installation | Checked |
| Enable Device Flow | Unchecked |
Under **Post installation**, leave the setup URL empty and leave **Redirect on update** unchecked.
## Step 3: Configure the webhook
Under **Webhook**, set:
| Field | Value |
| ---------------- | -------------------------------------------------------- |
| Active | Checked |
| Webhook URL | `https://api.prod.blocks.team/v1/webhooks/github/events` |
| Secret | Generate a new strong secret and save it securely |
| SSL verification | Enable SSL verification |
GitHub documents the events available to GitHub Apps in [Webhook events and payloads](https://docs.github.com/en/webhooks/webhook-events-and-payloads).
## Step 4: Set repository permissions
Under **Repository permissions**, set only the permissions Blocks needs:
| Permission | Access |
| -------------- | ------------ |
| Actions | Read-only |
| Administration | Read & write |
| Checks | Read & write |
| Contents | Read & write |
| Deployments | Read & write |
| Discussions | Read & write |
| Environments | Read & write |
| Issues | Read & write |
| Metadata | Read-only |
| Pull requests | Read & write |
| Webhooks | Read & write |
| Workflows | Read & write |
Leave all other repository permissions set to **No access**.
## Step 5: Set organization permissions
Under **Organization permissions**, set:
| Permission | Access |
| ------------------------------ | ------------ |
| Administration | Read & write |
| Members | Read-only |
| Personal access token requests | Read & write |
| Webhooks | Read-only |
Leave all other organization permissions set to **No access**.
Under **Account permissions**, leave every permission set to **No access**. Under **Enterprise permissions**, do not select any permissions.
## Step 6: Subscribe to events
Subscribe to exactly these events:
* Commit comment
* Create
* Delete
* Issue comment
* Issues
* Label
* Pull request
* Pull request review
* Pull request review comment
* Pull request review thread
* Push
* Repository
* Sub issues
* Workflow dispatch
* Workflow run
Leave all other events unchecked.
## Step 7: Choose app visibility
Under **Where can this GitHub App be installed?**, choose the option that matches your enterprise policy:
* **Only on this account** if the app should only be installed in the organization where you created it
* **Any account** if your enterprise admins want the same app to be installable by other accounts on the tenant
If you are recreating an existing app, match the original app's visibility and any optional feature settings before finishing.
## Step 8: Generate app credentials
After you create the GitHub App:
1. Copy the new **App ID**.
2. Copy the new **Client ID**.
3. Generate a new **client secret** and save it securely.
4. Generate a new **private key**, download the `.pem` file, and save it securely.
5. Keep the webhook secret you generated in Step 3 available for the Blocks configuration form.
Private keys, client secrets, and webhook secrets are sensitive credentials. Store them in your normal secrets manager and avoid pasting them into tickets, chat messages, or documentation.
## Step 9: Select the GitHub Enterprise (MU) integration
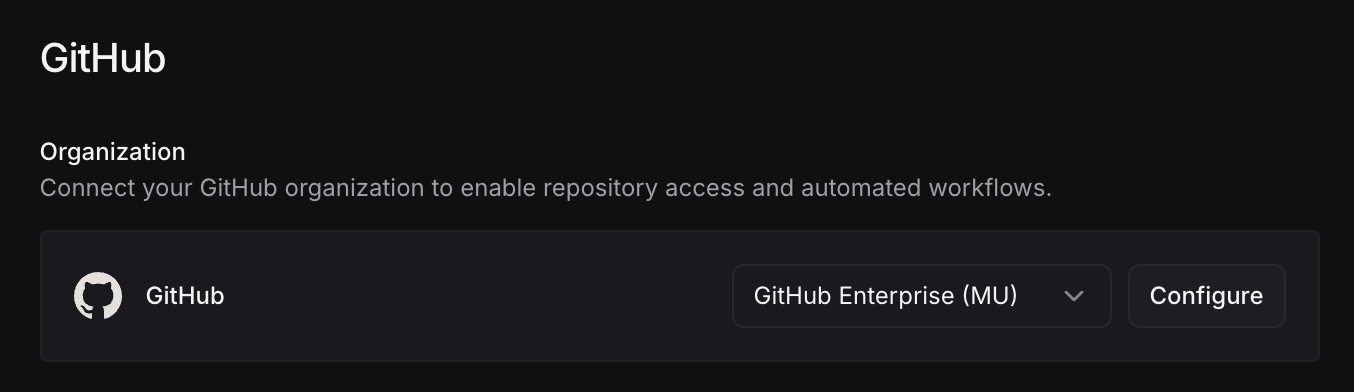
In Blocks, go to **Settings > Integrations > GitHub**. In the GitHub organization row, choose **GitHub Enterprise (MU)** from the dropdown, then click **Configure**.
 ## Step 10: Configure Blocks
Fill in the values from your GitHub App in the configuration dialog.
## Step 10: Configure Blocks
Fill in the values from your GitHub App in the configuration dialog.
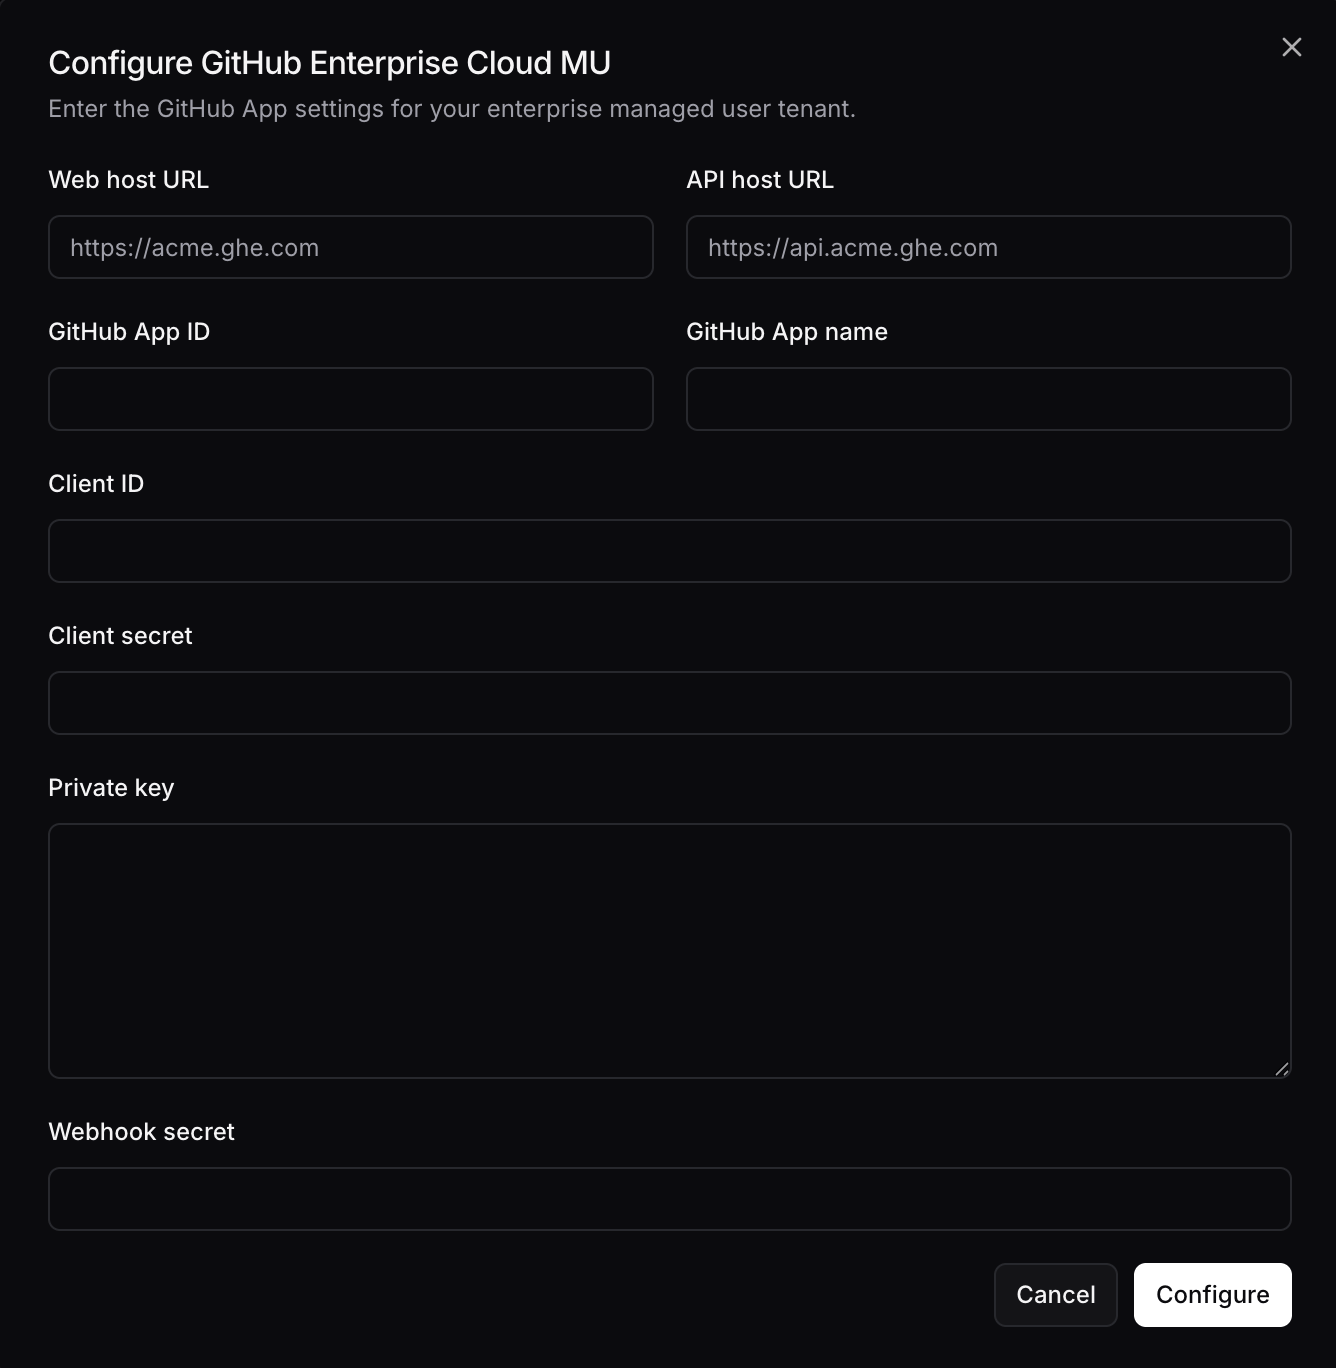 | Blocks field | Value |
| --------------- | --------------------------------------------------------------- |
| Web host URL | Your enterprise web host, such as `https://cubeorg.ghe.com` |
| API host URL | Your enterprise API host, such as `https://api.cubeorg.ghe.com` |
| GitHub App ID | The App ID from the GitHub App settings page |
| GitHub App name | The app slug/name you created, such as `CubeOrgSquaredApp` |
| Client ID | The Client ID from the GitHub App settings page |
| Client secret | The client secret you generated after app creation |
| Private key | The full contents of the downloaded `.pem` private key |
| Webhook secret | The webhook secret you created in Step 3 |
Click **Configure** to save the integration.
## Step 11: Install the app
Install the GitHub App on the organization and repositories Blocks should access. You can install it on all repositories or choose a selected set, depending on your team's policy.
After installation, you can mention `@blocks` in issues, pull requests, and pull request review comments in connected repositories.
## Troubleshooting
* **OAuth redirect fails**: Confirm the callback URLs are present and ordered exactly as shown in Step 2.
* **Webhook deliveries fail**: Confirm the webhook URL, webhook secret, and SSL verification setting match Step 3.
* **Blocks cannot read or write repository data**: Recheck the repository and organization permissions, then reinstall or update the GitHub App installation.
* **Private key errors**: Generate a fresh private key in GitHub, update the Blocks configuration, and make sure the pasted value includes the full `BEGIN` and `END` lines.
| Blocks field | Value |
| --------------- | --------------------------------------------------------------- |
| Web host URL | Your enterprise web host, such as `https://cubeorg.ghe.com` |
| API host URL | Your enterprise API host, such as `https://api.cubeorg.ghe.com` |
| GitHub App ID | The App ID from the GitHub App settings page |
| GitHub App name | The app slug/name you created, such as `CubeOrgSquaredApp` |
| Client ID | The Client ID from the GitHub App settings page |
| Client secret | The client secret you generated after app creation |
| Private key | The full contents of the downloaded `.pem` private key |
| Webhook secret | The webhook secret you created in Step 3 |
Click **Configure** to save the integration.
## Step 11: Install the app
Install the GitHub App on the organization and repositories Blocks should access. You can install it on all repositories or choose a selected set, depending on your team's policy.
After installation, you can mention `@blocks` in issues, pull requests, and pull request review comments in connected repositories.
## Troubleshooting
* **OAuth redirect fails**: Confirm the callback URLs are present and ordered exactly as shown in Step 2.
* **Webhook deliveries fail**: Confirm the webhook URL, webhook secret, and SSL verification setting match Step 3.
* **Blocks cannot read or write repository data**: Recheck the repository and organization permissions, then reinstall or update the GitHub App installation.
* **Private key errors**: Generate a fresh private key in GitHub, update the Blocks configuration, and make sure the pasted value includes the full `BEGIN` and `END` lines.